HIGHLIGHTS | How to take better photos
- Use natural light when possible and avoid really bright or really dark lighting.
- Make sure the background isn’t too distracting or cluttered.
- Experiment with different angles.
- For a flattering selfie, hold your phone as far away as you can and slightly above head level.
- A good rule of thumb is to apply filters after taking a photo.
Today is World Photography Day, a day to celebrate all the amazing photographs in the world.
Nowadays with the high-quality cameras on smartphones, many of us are photographers. But just because we can take photos easily doesn’t mean our photos always turn out the way we want them to.
It takes more skill and practice to shoot with a regular camera than it does a smartphone camera, but there are still strategies you can try to make your smartphone photos look better.
As an occasionally professional photographer who mostly photographs nature for fun, I’ve spent the past 15-plus years learning ways to make my images better. I do use a regular camera, but I also love taking photos on my iPhone.
Here are some tips and tricks I’ve learned that will help you make your photographs (including selfies!) works of art. I’m using phone photos I’ve taken of my pug, Jane — my favorite photography subject — to show examples of the different techniques.
Light is key
In most of the “bad” phone photos I see, there’s usually one main culprit: poor lighting. This could mean there isn’t enough light or there’s too much of it, the light is green or yellow or another strange color, or the light is coming from the wrong angle.
Outside of a photography studio with professional lighting, the best kind of lighting is usually bright but indirect. This goes for both natural and artificial light.
If you’re trying to take a selfie standing outside in a bright patch of sunlight, you’re probably squinting and look washed out in the photo. Conversely, if you take a selfie standing in a dark hallway, you probably won’t show up well in the image.
If you’re indoors, look for a spot that is bright but doesn’t have a light pointing directly on or behind the person or object you’re photographing. Outdoors, find an area with bright but indirect or filtered light: this could be a shady spot on a sunny day, or somewhere out in the open on a cloudier day.
If you’re taking photos of people, keep their skin tones in mind. Don’t put someone with dark skin in a dark corner or someone with light skin in the brightest spot. Also, try not to stand between the subject and the light source; this will cause your body to cast a shadow on the subject.
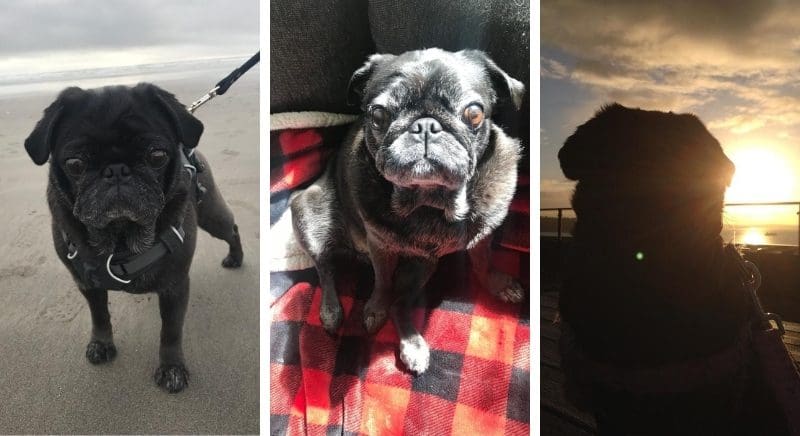
The left image was taken at the beach on an overcast day. The light is bright enough to show Jane’s face in detail but not too bright. The center image was taken with morning light streaming in through a window; the light is too bright and washes out Jane’s face. The right image was taken at sunset, with the light behind Jane, which makes her too dark and turns her into a silhouette.
Pay attention to the background
Busy backgrounds can make it harder for the subject to stand out. Also pay attention to shapes behind the subject that might make them look weird — such as the top of a tree or light pole that’s placed so it looks like it’s coming out of the top of their head.
Additionally, bright, large or otherwise imposing objects that are also in frame with your main subject can distract from what you want people to focus on when they look at the photo.
When you’re setting up the shot, look around the scene quickly to make sure there isn’t anything distracting in the frame. If you can move the distracting object easily, do so. If not, consider moving your subject somewhere else so the other stuff isn’t in frame.

In the left image, the background is simple and doesn’t take away from Jane’s silly yawning face. In the middle image, there are too many things in the background — buildings, a tree, cars, grass — that distract from Jane. In the right image, the image is poorly composed because it looks like the lamp in the background is protruding from Jane’s head.
Play around with depth
Despite the fact that simpler backgrounds are often better, that doesn’t mean the background or the rest of the shot has to be boring. One way to make a photo more compelling is to experiment with depth. Depth shows layers to the image and prevents it from looking flat.
For example, a photo of a person standing in front of a pathway that fades into the distance is going to be more interesting to look at than a photo of a person standing up against a blank wall.
For selfies, depth can still look good, but a selfie against a plain background can actually look professional as long as the lighting, focus and other key elements of the photo are good.
Some newer smartphones have advanced camera features that allow you to take portraits (like portrait mode for iPhone) where the subject is in focus and the background is much more out of focus, putting more attention on the subject. Take advantage of these features; don’t be afraid to try them out.

The image on the left has depth, showing the rock wall in the foreground, Jane in the middle and Crater Lake in the background. The image on the right has less depth; Jane doesn’t stand out from the background as much.
Try different angles
A photo taken from a lower angle can make the subject look grander and more imposing, whereas a photo taken closer up conveys a more personal feeling. Experiment with taking the photo from far away or close up, from off to the side, from above or below, and see how it impacts the image and which angle gives you the look you’re going for.
Angle is especially important with selfies. No one wants a selfie that’s super close up, as that’s usually not a flattering angle. Instead, try taking the photo holding your arm slightly above the height of your head and as far away as you can reach. Avoid taking selfies holding your phone lower than your face because this will distort your head and face.

The left photo was taken from below Jane to make her look grand and magnificent, even though she’s a small pug. The right photo was taken slightly above her to highlight her large, round head, tiny paws and silly expression.
Make sure the focus is right
It’s important to make sure your subject is in focus, especially on a phone camera, because the preview of the image can be deceiving.
Zoom in if needed and compare how sharp the subject is to the background. If the subject isn’t in focus, tap on the screen where the subject is to switch the focus. You may have to do this several times; note that it may also change the lighting.
Focus will usually be easier to notice right away on selfies, but you can still tap around the screen to correct the focus if needed.
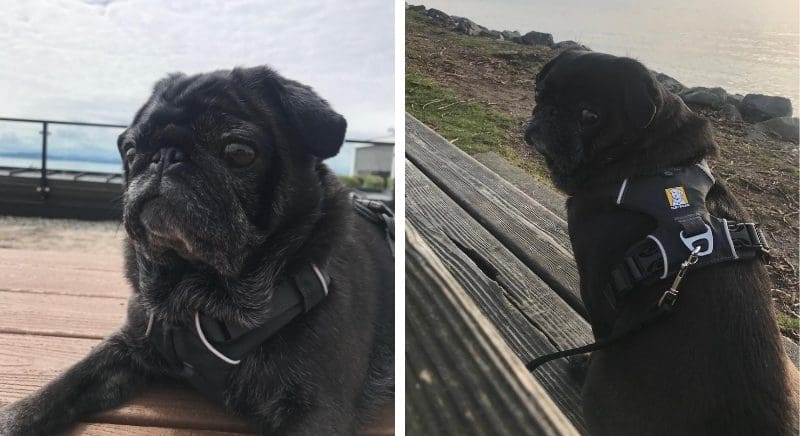
In the photo on the left, Jane is fully in focus. In the photo on the right, she’s slightly out of focus; instead, the bench to her left is the most in-focus subject in the photo.
Prevent blur
Motion blur can happen in a photo if your hand isn’t steady, if the subject moves or if you move before the camera is done taking the photo. In darker areas, motion blur is more likely to happen, so make sure you don’t move until the photo is taken.
If necessary, it can be helpful to prop your arm or hand on something — even your torso — to help keep the camera steady.

On the left, Jane isn’t blurry, but on the right she is.
Use filters after taking the shot
I never put filters on a photo until after I’ve taken the shot. Filters are great, and the ones you can use to take photos in can look cool, but if you decide you don’t like it after you take the photo, you’re out of luck because at this point the filter can’t be changed.
When you apply a filter after taking the photo, however, you can save it as a separate image. If you decide you don’t like it after all, you can go back to the original photo and try again with another filter.
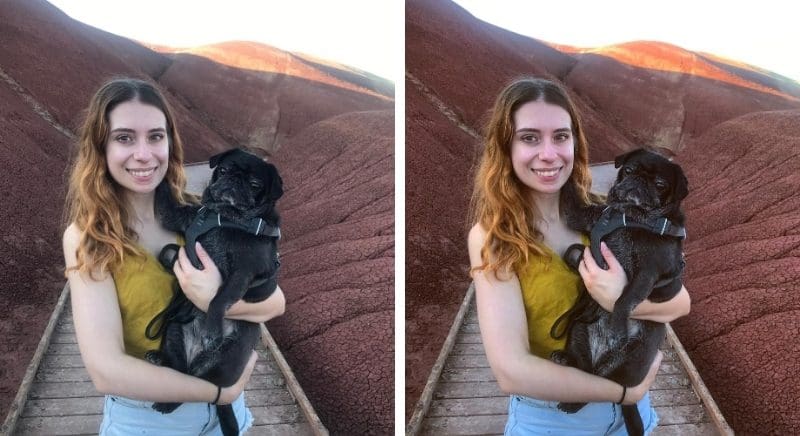
Photos of the author and Jane. The left photo is unedited; the right photo has had filters applied to increase color, brighten the photo, improve lighting and up contrast.
Don’t forget to have fun
While keeping these techniques in mind will help your photos be even better, it’s also important to let yourself relax and just enjoy the process. Taking photos should be enjoyable, not stressful. The more you experiment with how you want your images to look, the more you’ll learn and the more your skills will improve.